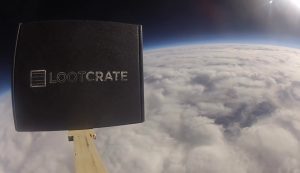
Did you know that we were the first subscription box in SPACE?!?! Well, ‘near-space’ that is. Read on to find out what that means, how we did it, and how you can do it too!
“Why not for now, we try to just send a crate into space and record it? People do it with science projects all the time”
That was the response I was met with just a little over 3 years ago, after unsuccessfully pitching (for the 4th time) that we send me on a zero-gravity flight to do the very first Zero-G unboxing. Figuring it was a step in the right direction towards the zero-g unboxing thing, and the fact that it just sounded like a lot of fun, I agreed. It wasn’t until later that night when I was watching YouTube videos of other things that people had sent in to near space that I REALLY got excited, just thinking about what footage of one of our crates in near-space would look like and how cool it would be.
Being a geek around all things science, tech, and engineering, I quickly began researching everything I’d need to know to increase the probability of success. First off, let’s address that “near-space” term, shall we? For those of you who’ve seen any of those videos of things like toy robots, Lego figures, and more ‘in space’ you’ll notice they very much look like anything else we typically see on tv or online that is ‘in space’. In actuality, those items you see are actually still well within the Earth’s atmosphere. The actual ‘edge of space’ is roughly around 328,000 ft above the earth, where as most weather balloons (which propel projects like this to near-space) rise to altitudes between 80,000-110,000 ft on average. This altitude falls into the 65,000 – 328,000 range commonly known as “near space”.
So what do you need to get footage of your favorite item in near space?
- 1 Weather balloon – A 1200G sized one is preferred, but smaller will also work, though may give less height.
- Payload – This is what the balloon is lifting, and the primary source of weight. Typically includes your item, any cameras, and other tech that is taking measurements, and a platform holding it all.
- Flight train – This is what connects your weather balloon to your payload. Usually contains a swivel of sorts (commonly known as a gimbal) that allows your balloon and payload to spin freely independent of each other to prevent any tangles and other issues.
- 219 Cu. Ft. helium tank – Recommended for a 1200-1500G size balloon.
- Small, rugged, lightweight camera with heavy duty battery – We used a GoPro camera, but there may be others out there that can hold up to the harsh conditions and temperatures as well.
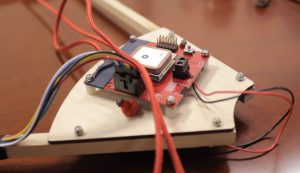
- GPS Unit capable of transmitting it’s data back to you – We used the SPOT Satellite GPS Messenger (link at end of article), which provides an online map of your gps data every 5 minutes. I also set up a twitter account at the time that was tied in to it to tweet us every time new checkin’s occured!
and… that’s about it! The only other items are perhaps some rubber gloves for working with the balloon to keep the oils of your skin from the balloon material. For those of you already asking yourself “where do I get a huge tank of helium, or find some of these other things?”, Don’t sweat! I’ll be providing links to everything at the bottom of this article.
Now that we had the equipment, it was time to figure out how and where we’d be launching this from, and how and where we’d be getting it back. You’ll first want to pick out some local launch spots that are big and wide open. Local parks, baseball fields, and the like are great for this, as long as there’s nothing around close by that the balloon and payload can bump into or catch on to on lift off. After that you could use the old fashioned method of pencil and paper and lots of math in relation to the 4 jet streams that circle the earth to try to calculate where your balloon will land, or, thanks to the University of Cambridge in the UK, we can put in all of our balloon and take off info online, and it will predict it for us! (Link below).
So you’ve got your balloon, your payload, you’ve figured out the best day, time, and location to launch from to get the balloon to land in a safe area….Time to launch!
Make sure to have at least a friend or two available to help assist you on launch day, you’ll need assistance tying the balloon off properly while not allowing it to touch the ground or get scraped or ruptured in any way. That said, be prepared and accepting that once out of your hands, anything can happen. The weather will take over after you let go, and miscalculations, hard winds, and more can do anything from causing your payload to flip over, or end up 100 miles away from where you intended. You’ll notice that the video at the beginning of this article says “Loot Craft 2”. Unfortunately we lost Loot Craft 1 and never found it, these things happen, even NASA has things go wrong from time to time.
- Once our GPS unit hit “GPS blackout” – the altitude (60,000 ft) where GPS’ stop transmitting data – we never heard from it again. Our GPS had a maximum operating temperature of -22 F (-33 C) to 140 F (60 C), and I knew that at it’s planned rate of ascent, it spent longer than I would’ve liked in the Troposphere, which at it’s peak can get to -51 F (-60 C). My hypothesis was that the GPS unit had frozen and died. For Loot Craft 2 I wrapped the sides and bottom of the GPS in hand warmers and had it inside the crate itself. This would help block some of the outside cool air and let the hand warmer heat build up inside the box, keeping the GPS receiver a reasonable temperature.
- With Loot Craft 1, I was focused on trying to break 100,000 feet. With 2, I just wanted to make sure we got it back. To do this, I found areas and places to trim extra weight off of the payload to get it lighter than before. I also overfilled the balloon with more helium than I usually do. While this would mean a lower burst altitude, it meant that the payload would climb higher faster, which meant less time spent in the below zero area of the troposphere for components to freeze up.
- This one is incredibly optional, as one GPS should be good enough, but.. because I wanted an extra fail safe in the event we had GPS lock up again, I took an old jailbroken iphone I had lying around, and programmed it to turn itself back on after it had been off for a couple hours. I then activated “find my phone” while it was up in the air. The idea being that battery would not be wasted on the 2+ hr flight up, and by the time it was on it’s way down, it’d power itself on and connect to the nearest cell tower upon landing and start sending me it’s location to assist in finding the payload.

Our TLM (telemetry) computer, which measured the height through out the flight.

Sweet, sweet, spacey goodness.

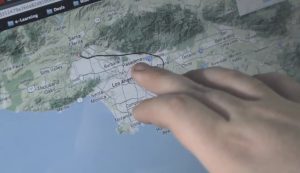
Viewing our projected flight path on a map.
So, what items would YOU send up if you could get video footage of them in near space? Share your answers down in the comments, and check out the links below if you’d like to build your own rig for near space flight! Have questions about your own near-space endeavors? Hit me up on twitter at @RockNRollGeek! Now if you’ll excuse me, I’m gonna go back to attempt #8 of convincing the powers that be to let me do that really rad zero-G unboxing!
Links:
- http://www.highaltitudescience.com – Tutorials, and sales of everything from individual parts to full kits for your near space flight needs! (US Based)
- http://sentintospace.com/ – Sales of full kits and much more (UK Based)
- http://habhub.org/calc/ – Balloon Burst calculator
- http://predict.habhub.org/ – Site to enter all of your data to predict your landing
- http://astra-planner.soton.ac.uk/ – Another balloon landing predictor
- http://www.findmespot.com – SPOT satellite GPS messenger.


